I have been using OpenCV for quite long now, and well I must say it is a very good library for implementing different image processing technique in real time. Previously I was using Ubuntu 10.04 along with OpenCV 2.20, which was very easier to setup as compared to my recent venture.
In order to test my projects on a slower system, I decided to work with OpenCV on my old desktop with Windows Xp. I thought it would be much easier and less time consuming to set up everything as Windows is always considered to be better at interacting with user. However after few hours, I was proven wrong.
Since I previously worked in Linux Envoirnment and my old desktop was slow enough to not smoothly run any IDE software, I wanted to setup something similar to linux terminal and gedit. After googling for few minutes, I successfully found the fastest, or should I say the slowest way, of setting up OpenCV. It involved using MinGW (minimalist gnu for windows) and OpenCV 2.0 precompiled library for MinGW. After installing everything, when I compiled a simple helloCV program, it crashed!
I tried compiling the OpenCV2.0 lib again using CMAKE 2.8.4, Msys 1.0 and MinGW 3.4.5, which produced error while 'making' highgui lib.
After that began my journey. Hours of googling, hundreds of tutorials, thousands of error, many compilations and many installations-uninstallations later came my final victory. I had successfully Compiled and Installed OpenCV2.0 with MinGW successfully linking and compiling my codes and programs running and not crashing.
Now I decided to write my own tutorial, to save anyone's time (if I can really do that)
So here it goes:
First download the packages you need to get started:


Now add all paths to bin each entry separated by a semi colon. e.g. for MinGW write C:\MinGW32\bin;
Next step is to install and compile OpenCV2.0. For this we will be needing CMAKE. Install both packages, during installation for CMAKE select Add CMake to System path for all users and check create CMake desktop icon.

for OpenCV2.0 DO NOT add to system path yet.

After installation, open CMAKE using the desktop icon.

On the CMake window Browse Source to the folder containing OpenCV2.0 Installation.( C:\OpenCV2.0 ) and enter the folder where you want to build in space next to Browse Build. (C:\OpenCV2.0MinGW).
Now click Configure and accept if it asks to create build directory.
Select MSYS as generator and specify native compilers, then click Next.


CMake will then show some fields, all in red. Write Debug in the value field for CMAKE_BUILD_TYPE.

If you want to make any additional changes, do that now and again click Configure until all fields change to White color.(as seen below)
 Now click Generate, after that close CMake window
For the next step, open Command prompt either from Start->All Programs->Accessories->Command Prompt or by running cmd from Start->Run.
In Command Prompt go to OpenCV build folder (c:\OpenCV2.0MinGW) and enter Make. It will take a few minutes depending on your system specs. After that is done successfully, enter Make Install to install the compiled libraries in the same folder.
Now add the folder C:\OpenCV2.0MinGW\bin to the System Variable Path as we did earlier.
Finally, test your compiled libraries using the following helloCV code (paste a jpeg in the same folder as compiled exe and change "image.jpg" to your file name):
Again this was a very confusing part for me, at first the helloCV code was compiling perfectly under my own compiled OpenCV2.0MinGW , but it was having problem finding the linker libraries. After reading a lot of tutorials on the internet, I was still unable to link my programs. So what I did was I browsed to the lib folder and checked the filenames of all the libraries which were very different from the originally installed libraries (c:\OpenCV2.0). These files had a .dll.a extension and the filenames had an extra 'd' added. So I started testing with different filenames and ended up with the working commands.
Thats all!
If this tutorial was helpful for you in anyway, then please leave a comment.
In order to test my projects on a slower system, I decided to work with OpenCV on my old desktop with Windows Xp. I thought it would be much easier and less time consuming to set up everything as Windows is always considered to be better at interacting with user. However after few hours, I was proven wrong.
Since I previously worked in Linux Envoirnment and my old desktop was slow enough to not smoothly run any IDE software, I wanted to setup something similar to linux terminal and gedit. After googling for few minutes, I successfully found the fastest, or should I say the slowest way, of setting up OpenCV. It involved using MinGW (minimalist gnu for windows) and OpenCV 2.0 precompiled library for MinGW. After installing everything, when I compiled a simple helloCV program, it crashed!
I tried compiling the OpenCV2.0 lib again using CMAKE 2.8.4, Msys 1.0 and MinGW 3.4.5, which produced error while 'making' highgui lib.
After that began my journey. Hours of googling, hundreds of tutorials, thousands of error, many compilations and many installations-uninstallations later came my final victory. I had successfully Compiled and Installed OpenCV2.0 with MinGW successfully linking and compiling my codes and programs running and not crashing.
Now I decided to write my own tutorial, to save anyone's time (if I can really do that)
So here it goes:
First download the packages you need to get started:
Once you have got all these files, first install TDM-MinGW 4.5.2. Followed by MSYS 1.0 installation. Specify the default paths for easy and simple set up.
Next add paths to bin folder inside MinGW and MSYS installation folders respectively to the System Path variable.
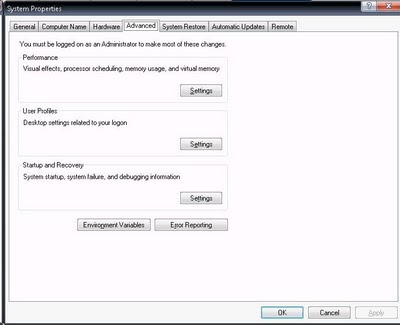
To add these path to system path variable go to Start->My Computer->Properties->Advanced->Environment Variables


Now select the path and then click edit.

Next step is to install and compile OpenCV2.0. For this we will be needing CMAKE. Install both packages, during installation for CMAKE select Add CMake to System path for all users and check create CMake desktop icon.

for OpenCV2.0 DO NOT add to system path yet.

After installation, open CMAKE using the desktop icon.

On the CMake window Browse Source to the folder containing OpenCV2.0 Installation.( C:\OpenCV2.0 ) and enter the folder where you want to build in space next to Browse Build. (C:\OpenCV2.0MinGW).
Now click Configure and accept if it asks to create build directory.
Select MSYS as generator and specify native compilers, then click Next.

Specify or Bowse to the location containing gcc.exe and g++.exe within the MinGW folder and click Finish.
( c:\MinGW32\bin\gcc.exe and c:\MinGW32\bin\g++.exe )
CMake will then show some fields, all in red. Write Debug in the value field for CMAKE_BUILD_TYPE.
If you want to make any additional changes, do that now and again click Configure until all fields change to White color.(as seen below)

For the next step, open Command prompt either from Start->All Programs->Accessories->Command Prompt or by running cmd from Start->Run.
In Command Prompt go to OpenCV build folder (c:\OpenCV2.0MinGW) and enter Make. It will take a few minutes depending on your system specs. After that is done successfully, enter Make Install to install the compiled libraries in the same folder.
Now add the folder C:\OpenCV2.0MinGW\bin to the System Variable Path as we did earlier.
Finally, test your compiled libraries using the following helloCV code (paste a jpeg in the same folder as compiled exe and change "image.jpg" to your file name):
#include "cv.h"for compiling and linking through MinGW use the following commands from Command Prompt:
#include "highgui.h"
int main(int argc, char** argv)
{
IplImage *frame;
cvNamedWindow("Example");
frame = cvLoadImage("image.jpg");
cvShowImage("Example",frame);
while(1)
{
char c = cvWaitKey(3);
if(c == 27) break;
}
cvReleaseImage(&frame);
cvDestroyWindow("Example");
return 1;
}
for compiling:
g++ -Ic:\OpenCv2.0MingW\include\opencv -oo -g3 -Wall -c -otemp.o filename.cpp
for linking to .exe:
g++ -Lc:\OpenCv2.0MingW\lib -ofilename.exe temp.o -lcv200d -lcvaux200d -lcxcore200d -lcxts200d -lhighgui200d -lml200dUse your own file's name and location at filename field.
Again this was a very confusing part for me, at first the helloCV code was compiling perfectly under my own compiled OpenCV2.0MinGW , but it was having problem finding the linker libraries. After reading a lot of tutorials on the internet, I was still unable to link my programs. So what I did was I browsed to the lib folder and checked the filenames of all the libraries which were very different from the originally installed libraries (c:\OpenCV2.0). These files had a .dll.a extension and the filenames had an extra 'd' added. So I started testing with different filenames and ended up with the working commands.
Thats all!
If this tutorial was helpful for you in anyway, then please leave a comment.