I have implemented code for using OpenCV 2.4.x with latest OpenNI 2.x SDK. Detailed tutorial and code on this newer method can be found here
After installing OpenNI, as I am more familiar with OpenCV, therefore I wanted to work with the data from Kinect sensor using OpenCV. I searched online and a lot of people had been able to compile and run OpenCV with OpenNI. However I could not find any guide on how to do this. I managed to compile OpenCV successfully with OpenNI after some research, and now I am writing this tutorial for those of you who are in the same situation as me.
If you already know how to compile OpenCV with Visual C++ then this tutorial will be straight forward for you. However for completeness sake I will write everything in detail, so even if you are new to OpenCV you wont have any problems compiling from the source code.
If you want to use OpenCV with Microsoft Kinect using OpenNI SDK then, obviously, the first pre requisite is that you should have already installed and set up Kinect sensor using OpenNI and NITE libaries. If you have not already done that then please head over to OpenNI installation Tutorial and first install everything needed to set up. If you have successfully set up everything correctly then precompiled samples inside OpenNI and NITE folders should be working with your Kinect Sensor., which means you are good to go with this tutorial.
Building Binaries
To compile OpenCV-2.4.1 with OpenNI support, first download OpenCV-2.4.1 source code and extract it to a folder. For simplicity I use the folder C:\OpenCVFiles\ for all OpenCV installations.
Next step is to use CMAKE to prepare code to be compiled into binaries and libraries. Install latest version of CMAKE with default settings. Once installed open CMAKE from desktop shortcut.
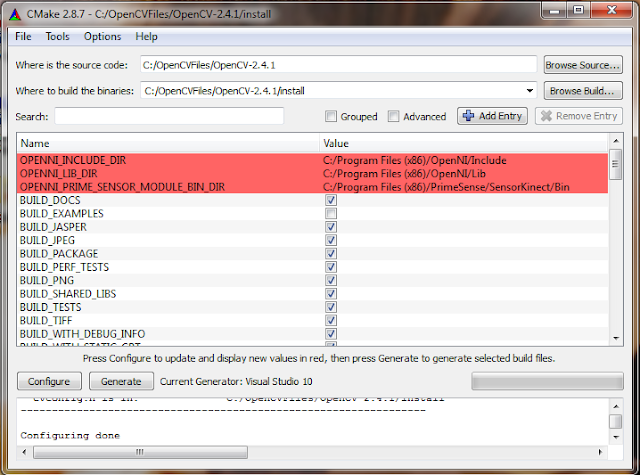
Now browse to the source folder and also enter the build folder as below. I use \install folder for the build but you can use any other location, just make sure that you remember where you placed your build files as these will be needed later to set up your project.
Click configure
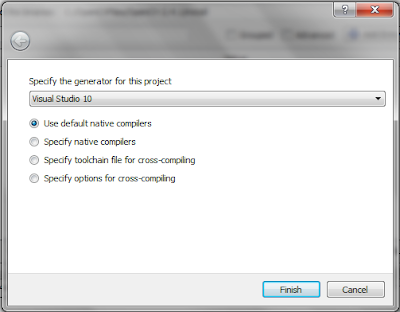
Select Visual Studio 10 with default native compilers
Click configure
Check option WITH_OPENNI and click configure again
Select Visual Studio 10 with default native compilers
Click configure
Check option WITH_OPENNI and click configure again
Make sure that the folders to OpenNI and Kinect drivers are correct and click configure again. If everything is fine then there will be no entries marked in red. To make sure that the build is configured properly with OpenNI, see the OPENNI field in the output window, it should say YES and should be configured with SensorKinect drivers.
Now finally click Generate and go to install folder to find the file named OpenCV.sln. Open this project file and in the solution explorer towards the left hand side, select ALL_BUILD and build solution. This will take a while.
Once the solution is build successfully for ALL_BUILD option, from solution explorer select INSTALL and again build solution. This will compile the binaries inside the folder
C:\OpenCVFiles\OpenCV-2.4.1\Install\Install
That's it for building the binaries. Next step is to configure your pc to use these binaries in a project.
Setting up pc to use the compiled binaries
To change the settings of your pc to use these binaries with your projects, you have to add the include, lib and bin folders inside the folder
C:\OpenCVFiles\OpenCV-2.4.1\Install\Install
to the environment variables. To do this go to Computer->Properties->Advanced System Settings->Environment Variables and under System Variables select variable named Path and click edit
To run a sample code,download the openni_capture.cpp file navigate to samples\cpp\openni_capture.cpp inside opencv folder and add it to your project. Build and Compile the code and if everything is working fine then you will be able to capture and display data from Kinect sensor directly using OpenCV.
Thats all! Please leave a comment if this tutorial helped you, or if you might want to add something to it, or if you are having problem at any of the above steps.
References:
http://docs.opencv.org/doc/user_guide/ug_highgui.html
http://seevisionc.blogspot.co.uk/2012/06/installation-of-openni-with-nite.html
Now finally click Generate and go to install folder to find the file named OpenCV.sln. Open this project file and in the solution explorer towards the left hand side, select ALL_BUILD and build solution. This will take a while.
C:\OpenCVFiles\OpenCV-2.4.1\Install\Install
Setting up pc to use the compiled binaries
To change the settings of your pc to use these binaries with your projects, you have to add the include, lib and bin folders inside the folder
C:\OpenCVFiles\OpenCV-2.4.1\Install\Install
to the environment variables. To do this go to Computer->Properties->Advanced System Settings->Environment Variables and under System Variables select variable named Path and click edit
Now if you have installed to the same location as I have done then add the following lines at the end of this variable, making sure that each entry is separated by a ;
If you have compiled in a different location then changes the following lines accordingly
C:\OpenCVFiles\OpenCV-2.4.1\Install\Install\bin;C:\OpenCVFiles\OpenCV-2.4.1\Install\Install\lib;C:\OpenCVFiles\OpenCV-2.4.1\Install\Install\include;
Click ok and apply the settings.
To set up a new project open Visual Studio and create a new win32 console project. Go to properties of this project and follow the following steps
Go to Linker->input->additional dependencies and add the following lines
C:\OpenCVFiles\OpenCV-2.4.1\Install\lib\opencv_calib3d241d.lib
C:\OpenCVFiles\OpenCV-2.4.1\Install\lib\opencv_contrib241d.lib
C:\OpenCVFiles\OpenCV-2.4.1\Install\lib\opencv_core241d.lib
C:\OpenCVFiles\OpenCV-2.4.1\Install\lib\opencv_features2d241d.lib
C:\OpenCVFiles\OpenCV-2.4.1\Install\lib\opencv_flann241d.lib
C:\OpenCVFiles\OpenCV-2.4.1\Install\lib\opencv_gpu241d.lib
C:\OpenCVFiles\OpenCV-2.4.1\Install\lib\opencv_highgui241d.lib
C:\OpenCVFiles\OpenCV-2.4.1\Install\lib\opencv_imgproc241d.lib
C:\OpenCVFiles\OpenCV-2.4.1\Install\lib\opencv_legacy241d.lib
C:\OpenCVFiles\OpenCV-2.4.1\Install\lib\opencv_ml241d.lib
C:\OpenCVFiles\OpenCV-2.4.1\Install\lib\opencv_nonfree241d.lib
C:\OpenCVFiles\OpenCV-2.4.1\Install\lib\opencv_objdetect241d.lib
C:\OpenCVFiles\OpenCV-2.4.1\Install\lib\opencv_photo241d.lib
C:\OpenCVFiles\OpenCV-2.4.1\Install\lib\opencv_stitching241d.lib
C:\OpenCVFiles\OpenCV-2.4.1\Install\lib\opencv_ts241d.lib
C:\OpenCVFiles\OpenCV-2.4.1\Install\lib\opencv_video241d.lib
C:\OpenCVFiles\OpenCV-2.4.1\Install\lib\opencv_videostab241d.lib
Go to VC++ Directories and add following lines to Include Directories:
C:\OpenCVFiles\OpenCV-2.4.1\Install\Install\include\opencv2
C:\OpenCVFiles\OpenCV-2.4.1\Install\Install\include\opencv
C:\OpenCVFiles\OpenCV-2.4.1\Install\Install\include
and the following lines to Library Directories:
C:\OpenCVFiles\OpenCV-2.4.1\Install\install\libThis guide uses the debug libraries, but if you need libraries for a release version then just erase the d at the end of each lib file.
To run a sample code,
Thats all! Please leave a comment if this tutorial helped you, or if you might want to add something to it, or if you are having problem at any of the above steps.
References:
http://docs.opencv.org/doc/user_guide/ug_highgui.html
http://seevisionc.blogspot.co.uk/2012/06/installation-of-openni-with-nite.html


